Sunday, June 26, 2011

W4-RILS-BP8- Links to Comments

Here are the links to comments I made on Kim and Nikki's blog posts. I chose to comment on their posts because I thought it was interesting how the same tool can be used for totally different purposes. 

Follow this link to my comments on Nikki's blog. 


Follow this link to my comments on Kim's blog.

Saturday, June 25, 2011

ETC Final Project


Relevant and Innovative Learning Scenario

ETC Final Project Video
 
Brief Overview:
This activity uses literature and shared writing to teach letter-writing format and promote authentic letter writing. Students listen to and talk about stories dealing with correspondence before participating in a collaborative, whole-group letter-writing activity. They go on to write their own letters to deliver to adult school helpers. Students often go on to write letters on their own time, which may generate ongoing correspondence.

Target Audience: My target audience consisted of eight 4th grade students and two 3rd grade students.

 Materials:
* Computers
* Internet
* Letter Generator:
* Copies of The Gardener by Sarah Stewart
* Copies of Dear Mr. Blueberry by Simon James
* Chart paper and markers
* Sample Letter  
* Letter Writing Checklist
* A container to hold letters waiting for mailing
* Paper and pencils
* Kidspiration
* Sticky Notes
 
Objectives:
At the end of this scenario, the learner will be able to summarize and discuss the purposes and conventions of their writing.
At the end of this scenario, the learner will be able to compose a letter for real purposes to an authentic audience.

At the end of this scenario, the learner will be able to define the names and conventions of a friendly letter.

Procedure:

SESSION ONE

1. Gather students together for a read-aloud of the book The Gardener. Explain that this is the story of a little girl who goes to live with her uncle in the city when her father loses his job, and that the story is written through her letters home. 

2. Read The Gardener aloud. Ask students to take note using their Sticky Notes of the different parts Lydia Grace includes in the letters she sends. As they identify the components, provide the labels for them if students do not know them:

                        date 

                        salutation or greeting 

                        body 

                        closing 

                        postscript (PS)
3. At the end of the story, have students respond to the story itself. Help students discuss the different purposes Lydia Grace uses letters to achieve. Possible answers include sharing information, expressing something that is difficult to say face to face, expressing gratitude, and so forth. 

4. Explain to students that the class is now going to write a letter together. Ask them to think about someone at school who has been helpful to them in some way. A good choice may be the principal, but students can help decide on any adult who has made a contribution. 

5. After students choose the letter recipient, have them briefly brainstorm ideas to include in the letter. 

6. Tape chart paper to the board to begin the shared letter-writing activity. Continue to elicit information for the letter from students through questioning. Make sure that all letter-writing elements are included: date, salutation, body, closing, and postscript. 

7. After the letter is complete, label the components and keep the finished product on display for reference in the next session. 

8. Tell students that in the next session, they will be writing a letter to someone (an adult) within the school who has done something to help them.

SESSION TWO

1. Begin the session by telling students they are going to continue their study of letter
   writing and gather them for a read-aloud of Dear Mr. Blueberry. Discuss the nature and    
   style of ongoing correspondence between Emily and Mr. Blueberry.
2. Review with students the parts of the letter using the sample from the previous session.
   Share with them the Letter Generator Web 2.0 tool to have another model for the product. 


3. Share/introduce the Letter Checklist so students can self-evaluate their letters before
   Mailing them via office mailboxes.  


4.  Have students open the Letter Generator for another review of the parts of a letter. Ask
     students to move on in the Letter Generator to begin their letters.

5.  As students write their letters, have them use the class-made references when
    necessary.

SESSION THREE

1. Have students share letters in small groups and help each other revise and expand on   
    their thoughts where appropriate. Give students time to return to the Letter Generator    
    to make revisions if necessary. 


2. When students are finished, make a model of an envelope using a horizontal full sheet    
     of construction paper, showing the correct placement of the return address and   
     recipient’s address. Have them address their envelopes and affix stamps for mailing. 


3. The class will walk to the main office to deposit their letters in the appropriate   
     mailboxes.

Web 2.0 Tool:
Letter Generator: This online tool allows students to read about the parts of a letter. They can then write and print their own friendly letter. The Letter Generator is a useful tool for students to learn the parts of a friendly letter and then compose and print letters of correspondence.

Social Participation/Social Learning:
Through-out the lesson the students will be instructed to “turn and talk” and the students will be required to share their letters in small groups and help each other revise and expand on their thoughts where appropriate. Students will be given time to return to the Letter Generator to make revisions if necessary.

Making Connections:
The students will make a connection when thinking of that someone who has been helpful to them in some way.

Create/Produce:
The students will compose a friendly letter for a real purpose to an authentic audience.

Assessment:
The Letter Writing Checklist 

Reflection:
The students will reflect by sharing their experience of writing a friendly letter in their daily journals. 

The students enjoyed typing and using the computers rather than writing. 

The educator will evaluate the success or lack of success of writing a friendly letter by using the Letter Writing Checklist and make changes as needed. 

Using the Web 2.0 tool was a success! I enjoyed teaching the lesson and my students certainly enjoyed learning the process of writing a letter using this great tool. In the future, I may use another form of reflection for the students because as struggling writer's their journal entries were vague. Therefore, requiring some conferences, which took up a lot of time. Maybe verbal expression would be a better format of reflection for them. 


Sunday, June 19, 2011

PE5-The Letter Generator

Are you ready to continue along with me on my adventure of becoming an expert with the Letter Generator Web 2.0?

Here we go!

By the way, did I mention earlier that this awesome tool is FREE? Yea, that's right, FREE!


Before I share a sample letter written by a student, I would like to share more with you about this cool tool.

This very useful tool can also serve as an excellent practice method for composing and proofreading formal and informal letters. 

As you can see in the above screen shot, this tool provides the writer with an opportunity to view a sample letter with all the essential parts of the letter labeled by simply clicking on the sample letter. Below you will find the sample letter.


During my lesson, I would have the above screen on my Smartboard for my students to use as a sample guide as to what their letter should look like. In addition, the students will be given a Letter Checklist which includes the requirements for successfully completing the assignment. 


I used this awesome Web 2.0 Tool with my group of 3rd and 4th grade special education students and I was so relieved to see them writing without complaining or constantly asking me for help, basically needing me to think for them. They were engaged and more willing to be risk-takers during Writer's Workshop, which doesn't occur very often. 


Thank you for joining me on my Letter Generator adventure. I hope you enjoyed the process as much as I did. Be sure to visit again real soon!

PE4- The Letter Generator

Welcome Back!
I'm glad you have chosen to join me on my Web 2.0 Letter Generator adventure.


The Letter Generator is a tool designed to help students learn to identify all the essential parts of a business or friendly letter, and then generate letters by typing information into letter templates. Once students have become familiar with letter formats, they are instructed to write their own letter.  As you can see in the screen shot above, the Letter Generator provides a description of each letter type. A friendly letter is one you would write to a friend or relative and a buisness letter you would write to someone you don't know. At this point, students follow the easy steps and fill in specific information in the template provided. 

Here are the easy steps to follow after entering your name and letter type:

Step 1: Heading
The Letter Generator informs the students of the location of the heading and what the heading contains.
The heading appears in the upper right-hand corner. It contains the sender's address and the date the letter is written. This Web 2.0 template contains specific areas with step by step instructions. After typing in the required information, simply click next to continue on to the next step.


Step 2: Salutation
The salutation is the greeting. Here is where you type in the name of the person to whom you are writing. The instructions also remind the writer to include a comma after the name. Simply click next to continue.

Step 3: Body
The body is the main part of the letter that tells what you have to say. Also reminding the writer to indent each paragraph and include a line space between paragraphs. 

Step 4: Closing
The closing is used to end your letter. As you can see in the screen shot below, this great tool gives examples of closings and also reminds the writer to include a comma after the closing.


Once the closing and comma are typed in, simply click next to continue.

Step 5: Signature
This is where you include your name. Also reminds the writer to sign their name under the closing after printing.

Step 6: Postscript
Postscripts are used to add more to your letter after you have signed your name. Here the writer is also reminded to start by typing P.S. and then add your final message. Simply click next to continue.

Optional Step: Border
Although a border isn't an essential part of a letter, using a border can make your letter more friendly and personalized.

The Final Step: Review your letter and make changes if needed by clicking the back button. 
When the letter is final, you have several options. you can print your letter, save final or share final by emailing your letter. During this step you can also view instructions on addressing an envelope.


Be sure to check out my next blog to learn more about this awesome Web 2.0 Tool and how easily you can access it! It's easy to use, right?

Sunday, June 12, 2011

BP7_1minutevideo

BP6_Marquita's Blog


“The more that you read, the more things you will know. The more that you learn, the more places you'll go.” ~ Dr. Seuss~


Follow this link to my comments on Marquita's blog.

BP5_Nikki's Blog


 http://www.wordle.net/


BP4_makebeliefscomix


MakeBeliefsComix.com
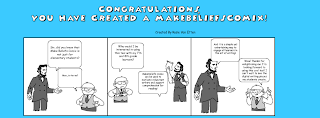
Make Beliefs Comix is a web 2.0 site that offers individuals an opportunity to display their creativity and explore new possibilities. The easy to use site allows individuals to choose their own characters and add their own dialogue for each section of the comic strip.  
The site provides easy to follow directions and also offers a demonstration on how you can begin creating an imaginative and interesting comic of your very own.

Follow these simple directions and before you know it, you will have created your very own comic on literally any topic and/or subject area of your choice.


Begin by choosing a character and emotion.
Then insert your character into any panel window.
Add dialogue or thought balloons and start your character talking.
Add other characters and more dialogue. You can also add background color if you choose.
Add objects and panel prompts to keep your viewer engaged.
Lastly, you can review your creation, you can continue editing and make additional changes and when you are done simply click on print or you also have an option to email your creative comic to a friend.

Check out my comic creation!


Thanks again for visiting; Come back soon!


Saturday, June 11, 2011

PE3_iMovie

Welcome back! I have been anticipating with great excitement my next adventure in Lynda.com. If you can believe it, I learned even more while watching the last few chapters and I can't wait to implement some of the effects in a previous video project. Are you ready? I certainly am, so here we go!

While watching the Effects chapter, I constantly found myself reflecting and thinking about the feedback I received from Michelle regarding my Interview Video. Before pointing out what is wrong with my video clip, I would like you to take a look.


So, did you notice how jumping the video clip was?  Now I would like you to watch the video clip after I stabilized the video and added a sound effect.

PE2_iMovie

Hello, I'm back to share more of my iMovie practical learning experience adventure. As I continued watching Chow's Training Videos via Lynda.com, I have learned so much more! In my past video projects, I usually tried to complete the entire project at once rather than short clips mainly because I really had no idea how to begin editing my projects. In fact, I did not attempt to do any editing at all until my last group project because I always feared losing my work after spending so many hours finally getting it recorded. Well, I am now fearless! Especially after learning I can trim a clip without actually losing my original clip. 


In addition, the days of me spending hours upon hours trying to create a video that contains no interruptions or starting the recording completely over because an unexpected sound or object has interfered with my recording are no more! After participating in Chow's online training, I feel so much more confident. Rather than recording a clip over or accepting the fact that there is an unwanted object in my video, I can simply crop the clip and the unwanted object disappears.


When choosing the crop feature, the clip appears in the viewer with a green edge as shown in the above screen shot. You can easily crop the clip by clicking and dragging any of the corners to zoom in, position the clip and click done. Sounds pretty easy, huh?  


Are you ready for yet another editing tool? I was pretty excited to learn about the advanced edit tool offered in the iMovie application. The edit tool will only appear on the tool bar if you have the advanced tool selected in preferences. So if you do not see the edit tool on the tool bar, simply click on iMovie, preferences, general, check show advanced tools. This editing tool allows you to add clips quickly and easily eliminating having to click and drag every clip to your project panel. I love it! I can't tell you how many times I was unsuccessful at clicking and dragging clips to my project. Often causing unnecessary frustration. Thank you for joining me on my training adventure in editing. I'm so excited to begin utilizing the editing features offered in the iMovie application.

PE1_iMovie


Aside from providing me with an opportunity to learn “cutting edge” technology that I can integrate into my educational curriculum to enhance the learning experience for my students, one of my greatest gifts of enrolling in the Educational Media Design and Technology program at Full Sail University was the ownership of my very first Apple laptop, MacBook Pro. Yes, you heard me correctly! I’m in the process of developing a strong and loving partnership with my new mate. Initially, I felt overwhelmed because I do not consider myself to be “tech savvy” nor did I have prior experience using a Mac. Hence, my first iMovie video assignment that consisted of less than 60 seconds of video, took me hours to complete. Through trial and error and discovery, my video quality has slightly improved.
One of my ETC assignments this week was a practical learning experience with iMovie ’11 Essential Training with Garrick Chow through Lynda.com. Lynda.com is basically an online library that offers software trainings and tutorial videos. 
To access Chow's online training, I used the search box feature on the home page.

Here is where my valuable practical learning experience began:

Almost immediately upon my start of viewing the iMovie Essential Training with Garrick Chow, two thoughts flashed through my mind. One being, I wish I had participated in this online training prior to my first assignment that required me to use iMovie and two being, my videos are evidence of why this training is essential.

Some of you may chuckle, but I'm being honest. I may or may not be alone on this, but my learning literally began on Chapter 1: Getting Started. 


Until I started the EMDT program, iMovie was completely foreign to me so I really had no idea what version I had. However, I easily followed the direction of Garrick Chow and soon discovered I had the 9.0 version. 

Although Chapter 2: Importing Video was also very informative, I want to focus more so on Chapter 3: Understanding the Interface. Again, some of you may chuckle, but I really wish I had the opportunity to participate in this training at the beginning of this program. In doing so, I could have saved a tremendous amount of time trying to figure out the basics and more time on perfecting my videos. I learned so much by watching this section.


For instance: I now understand the difference between the Project and Event Library and the panes associated with each. As well as how to properly use the Event Library to organize my videos rather than completely deleting all of my work when starting a new project to avoid confusion and frustration. In addition, I'm thrilled to learn that I can actually retrieve the projects I have previously trashed. Lastly, learning the different items in the tool bar and their functions is going to be extremely useful when creating future projects. Such as, rating clips, voice over, cropping, adding a selected clip without dragging, muting audio, adding titles, transitions and backgrounds. Although I have used some of these features in previous projects, I now have a better understanding of the implementation process and definitely feel more confident in utilizing the functions to their full potential.


Saturday, June 4, 2011

BP2_Little Bird Tales

http://littlebirdtales.com/home/default/


As a special educator, my students often struggle with the writing process. I chose to research, navigate and learn how to use the Web 2.0 tool, Little Bird Tales. Using this tool will help minimize stress levels for my students and provide them with a fun tool to use in creating, recording and publishing unique stories that can be shared online.  

Little Bird Tales is a free service, without advertising, links or merchandising that was created with kids in mind. This tool encourages creativity and self-expression while reinforcing the essential skills of reading and writing. 

3 Easy Steps


Little Bird Tales will guide my students through three easy steps in creating a unique story that can be connected to our curriculum no matter what the subject area. The steps in creating a story from start to finish are as follows:

Step 1:
Create a Cover by uploading a photograph or illustrating the cover using the drawing option and click save.

Step2:
Record your voice and text to each page and click save.

Step 3:
Email friends, teacher, or family your finished book.


Click here to view my Colorado Adventure story.


Click here to view a Little Bird Tale sample created by a student

Thank you for visiting and I encourage you to explore this fabulous Web 2.0 tool!


BP3_ iGoogle Screen Shots


Thank you for stopping by to check out my latest adventure! After many hours of determination, I have successfully created my Personal Learning Environment on iGoogle.  Wow! What an amazing learning experience for me. The smallest task of creating a Box of Links to attach to my tabs took me forever to figure out, but something I will NEVER forget. I am looking forward to utilizing my PLE throughout my time at Full Sail University and beyond! 


iGoogle PLE Home Page


iGoogle FSO/CBR Page


iGoogle FSO/CBR Page Extended


iGoogle ETC Page


iGoogle ETC Page Extended


Thank you for joining me on my PLE Adventure; come back real soon!

Thursday, June 2, 2011

BP1_Welcome to my blog post


“Winners take time to relish their work, knowing that scaling the mountain is what makes the view from the top so exhilarating.” - Denis Waitley
Welcome to my blog! I have always liked to live life like an adventure. Come along with me as I begin my exciting adventure into a new territory of blogging. I’m going to be exploring and discovering new technology and Web 2.0 tools with the intention of sharing my experiences to engage educators and learners. In doing so, I hope to inspire others who may be hesitant to explore uncharted territories. Thank you for visiting my blog; come back again to join me on my journey of discovery and exploration of the phenomenal technology opportunities available to us!